
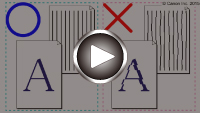
Aligning the Print Head
If printed ruled lines are misaligned or print results are otherwise unsatisfactory, adjust the print head position.
![]() Note
Note
- We recommend using the same type of paper for print head alignment as for printing.
- Plain paper cannot be used for print head alignment.
-
If the remaining ink level is low, the print head alignment sheet will not be printed correctly.
Replace the ink tank whose ink is low.
You need to prepare:
For A4 or Letter size paper: three sheets
For A2 or 17" x 22" (43 x 56 cm) size paper: a single sheet
-
Make sure that the power is turned on.
-
Select Maintenance on the HOME screen, then press the OK button.
The Maintenance screen will appear.
-
Select Print head alignment, then press the OK button.

The Print head alignment screen will appear.
-
Select Auto, then press the OK button.
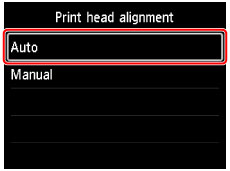
The confirmation screen will appear.
-
Select Yes, then press the OK button.
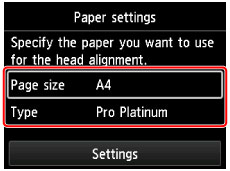
The paper settings screen will appear.
Specify Page size and Type for the paper to be used, select Settings, then press the OK button.
-
Load the prepared paper in the paper source specified in the message.
If the paper source is the manual feed tray, load one sheet of paper at a time.
-
Open the paper output tray gently.
Open the output tray extension, then pull out the paper output support.
-
Press the OK button.
The print head alignment sheet will be printed and the print head position will be adjusted automatically.
This takes about 12 minutes for A4 or Letter size paper and about 9 minutes for A2 or 17" x 22" (43 x 56 cm) size paper.
 Note
Note-
If the automatic adjustment of the print head position has failed, an error message appears on the LCD.
-
-
When the completion message appears, press the OK button.
![]() Note
Note
- If the print results are still not satisfactory after adjusting the print head position as described above, align the print head manually.
